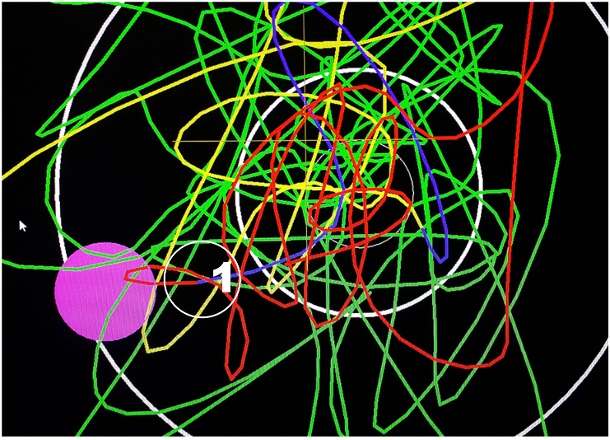
One of the oddities that has
arisen from checking SCATT files is the position of the shot hole to the
intersection of the RED and BLUE lines. We know the Blue line is
generally set at .250m/s before the shot and the Red line is the follow
through. With the Coefficient set at around 12, the shot hole appears
after the moment the shot firing has been registered by the SCATT
sensors. This would indicate that the trigger has been harshly operated
and the barrel is moving in a faster manner than before in the
holding/sighting stages.
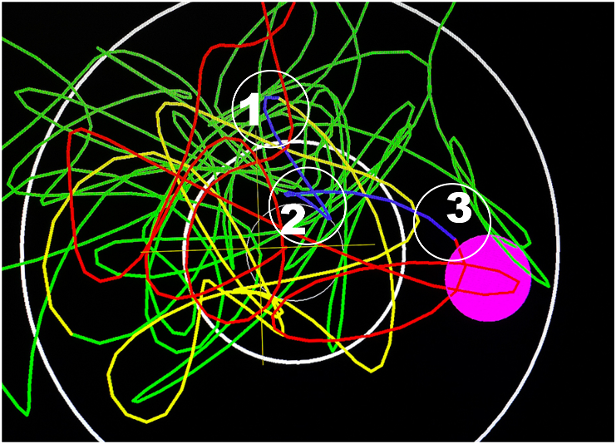
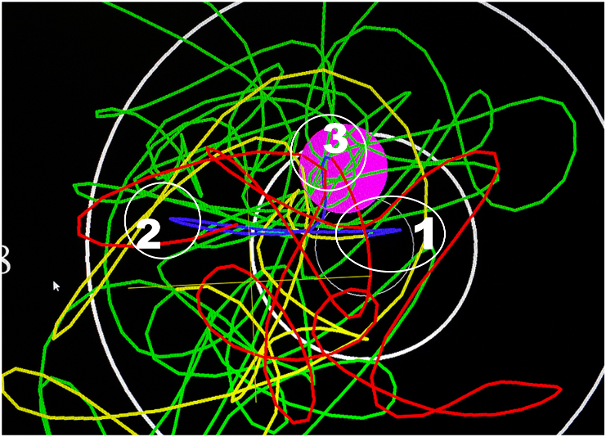
This graph shows again the
harsh trigger movement with the sudden changes in direction highlighted
with Numbers 1, & 2. Number 3 shows the shot hole again appearing
after the junction of the Red and Blue lines. It can be seen that the
Yellow line, just before it changes to Blue, has started an upward
movement. This shows the beginnings of the rapid trigger movement by its
sudden countering in a downward movement once it changes to Blue in
number 1 and the sudden back and forth movement in number 2. Follow
through is maintained somewhat but we suggest this would be due to a
strong holding ability rather than skill.
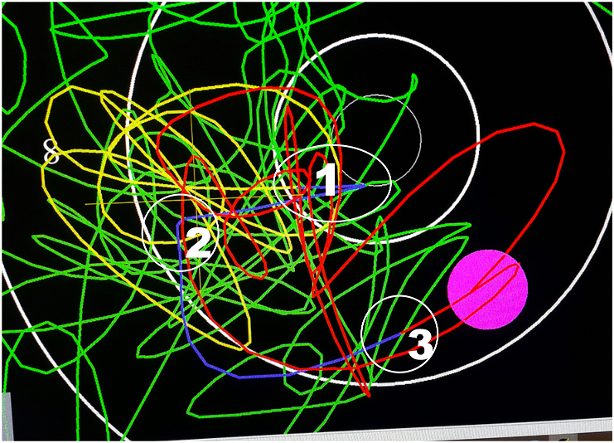
The same situation has
occurred here with a greater amount of movement which shows the shot
hole significantly past the point of execution indicated with the
intersection of the Blue and Red lines. Number 1 shows the transition
from Yellow to Blue. Follow the yellow line back and you notice its
direction changes moving from the number “8" towards the centre of the
target. It would be reasonably assumed the hand eye coordination has
seen this movement and countered with the sudden movement back to the
left once the Blue line indicator has started. This in turn has started a
hurried movement in sighting and trigger movement hence the amount of
over travel of the shot hole. Also, indications show follow through to
have “sharp” edges which show rapid movement.
Final graph
does show the Yellow and Blue lines intersection in number 1, but still
shows rapid change in direction left, then right and sudden stop, then
slightly upward to fire the shot. A slightly better execution but still
has the markings of trigger press being very rough and sudden. We are
endeavouring to achieve the same flowing movements as seen in the build
up as in the Green lines and continue these movements until the shot is
fired and indeed after the shot into follow through.